
Deploying OpenShift Enterprise on Atomic Host with Satellite 6.2
The Environment
The basic lab environment consists of a single Satellite 6.2 server running an integrated capsule providing the necessary services. Most important for us to consider is DHCP and TFTP for the provisioning the Atomic Host on bare metal hardware. Our Satellite 6.2 server is a bare-metal machine running inside a blade server. Atomic Host is situated in the same VLAN on the network on a separate bare-metal hardware of the same specifications. DNS was set up on the Satellite server, making sure that all the machine in the environment can access it. The details of set-up will be shown below.
| Setting | Value |
|---|---|
| Satellite IP (private) | 192.168.1.1 |
| DHCP Range | 192.168.1.100 - 192.168.1.200 |
| DNS Server | 192.168.1.1 |
| Web UI Address | satellite6.example.com |
The Nuts and Bolts
Setting the Satellite up
Having the Satellite packages downloaded and installed via yum, you can start configuring the Satellite to support the provisioning and discovery. Additionally, we'll immediately add the OSTree support which is needed for the update of Atomic Host machines. Here's the set-up command executed for the environment in which we're currently working. The bold part shows the important configuration option needed to make the OSTree synchronization and content delivery via Satellite possible:
[root@satellite6 ~]# satellite-installer --scenario satellite \
--foreman-admin-password=changeme \
--katello-enable-ostree=true \
--foreman-proxy-dhcp true \
--foreman-proxy-dhcp-interface enp0s8 \
--foreman-proxy-dhcp-range "192.168.1.100 192.168.1.200" \
--foreman-proxy-dhcp-gateway 192.168.1.1 \
--foreman-proxy-dhcp-nameservers 192.168.1.1 \
--foreman-proxy-tftp true \
--foreman-proxy-tftp-servername $(hostname) \
--capsule-puppet true \
--foreman-proxy-puppetca true \
--foreman-proxy-dns=true \
--foreman-proxy-dns-interface=enp0s8 \
--foreman-proxy-dns-zone=example.com \
--foreman-proxy-dns-forwarders=10.38.5.26

[root@satellite6 ~]# satellite-installer --enable-foreman-plugin-discovery
At the time of this writing, there is one package missing, which is actually needed for the provisioning to work. That's foreman-discovery-image which can be simply installed by yum. After installing the foreman-discovery image, you can restart the services needed for the discovery.
[root@satellite6 ~]# yum install foreman-discovery-image
[root@satellite6 ~]# systemctl restart httpd foreman foreman-proxy
And lastly, we should make sure that the firewall rules are properly set-up. Red Hat Enterprise Linux 7 comes with firewalld, and we’ll use the firewall-cmd to open the required ports. We need to make sure that TFTP and the required Satellite services which are all bundled under RH-Satellite-6 are enabled. The configuration is quite simple and consists of a few commands only.
[root@satellite6 ~]# firewall-cmd --permanent --add-service=RH-Satellite-6
success
[root@satellite6 ~]# firewall-cmd --permanent --add-service=tftp --add-service=dns
success
[root@satellite6 ~]# firewall-cmd --reload
success
Preparing the discovery and provisioning
Before we go into deeper configuration, it is generally a good idea to have all the required packages synced. You can do this under Content menu within Satellite web UI. Navigate Go to the Content and choose Red Hat Repositories. The important one to choose for us is OStree under OSTree tab. Having more content synced however, would not present a problem.

After the repositories have been chosen, and sync initiated, take a moment to check that the Organization you are using is configured properly.
You should check your Organization settings under Administer drop down menu. Important thing to note here is that an adequate Domain should be selected for the Organization you are working with. This setting will be needed later down the line, when we start configuring Host Groups.
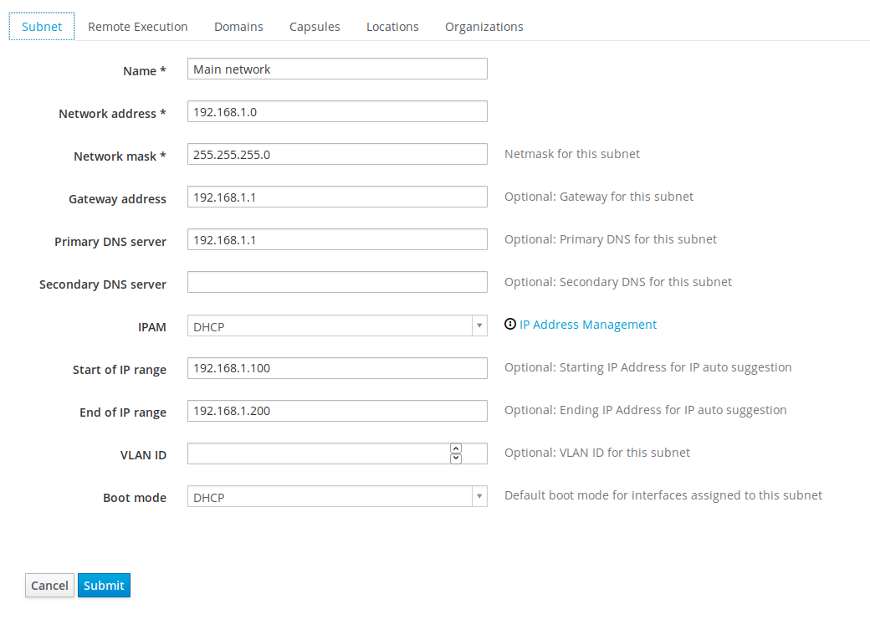
Lastly, we should configure the subnet which we intend to use for our deployments. The subnet configuration is found under Infrastructure, Subnets. Go over the tabs and select the Remote Execution capsule if needed. Check the "Domain" we created in previous step, to which this subnet will be connected to. Choose all the Capsules required on the subnet. And finally include a Location, which in our case is a Default Location.
Here's what a first tab of a filled in Subnet form looks like in our example deployment:
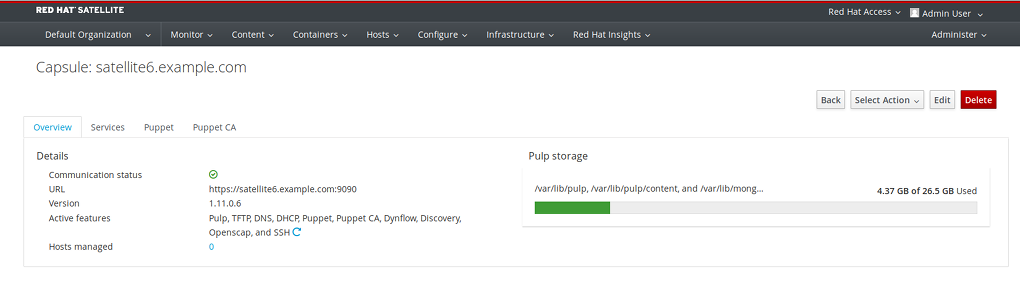
Under Infrastructure -> Capsules you should have the relevant features enabled within the default Satellite 6.2 capsule. In our case those are: Pulp, TFTP, DNS, DHCP, Puppet, Puppet CA, Dynflow, Discovery, Openscap, and SSH. Check that the correct Domain is selected under Infrastructure, Domains menu as well.
Creating Installation Media
In the near future, the steps covered in this section will not be necessary, since syncing the Kickstart repository for the Red Hat Enterprise Linux Atomic Host will take care of this step for us.
At the time of this writing however, a few manual steps need to be done in order to create Installation Media for the Atomic Host. This will be used after the system discovery to provision (ie. install) the Atomic Host.
The first thing needed is to download an ISO which would install the Atomic Host. The ISO is available at https://access.redhat.com/downloads/content/271/ver=/rhel---7/7.2.0/x86_64/product-software. There are a few options for download on that page, but what we need to download is "Red Hat Atomic Installer".
Once downloaded there are two possible routes to take:
* Extract the ISO to a location which is accessible by your compute resource (eg: /var/www/html/pub/atomic):
* Loop mount the ISO to the same location as above instead of copying (since we are not really changing any files there, the read-only mount we have makes no difference)
For our test deployment the second approach is sufficient and faster. So, after the ISO has been downloaded, we mount it on the public location into the folder we have created:
mount -t iso9660 -o loop /images/rhel-atomic-installer-7.2-10.x86_64.iso /var/www/html/pub/atomic/
Note: This image will be needed only for deploying new Atomic Hosts, additional OSTree upgrades will be done via Satellite. Be aware however, that if you reboot your Satellite this mounted image would have to be re-mounted in order for it to be available for future Atomic Host deployments. Now that we have the installation image ready, we can create the installation media which Satellite can use.
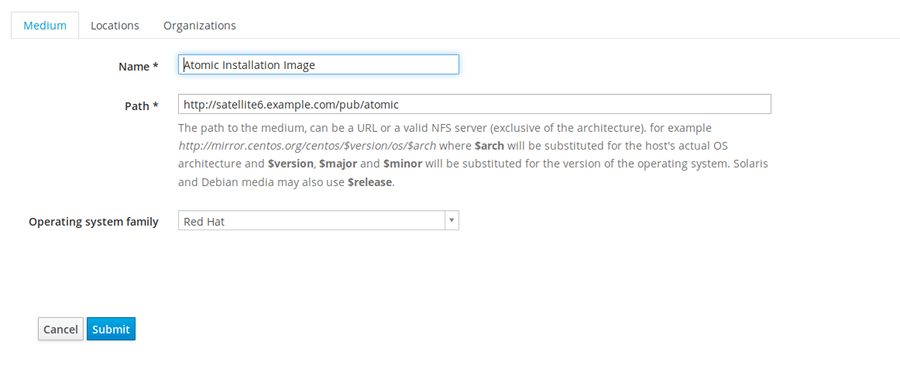
Go to Hosts -> Installation media. Click on "New Installation Medium". Make sure you have the right Location selected as well, in the "Locations" tab.
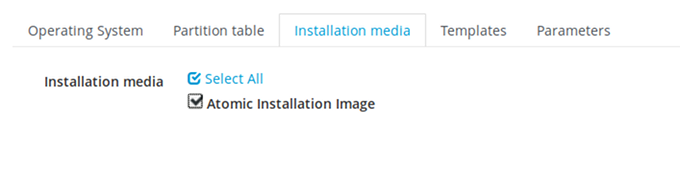
Finally, add this installation medium to the Operating Systems definition, under Hosts menu as well. When you click on Operating Systems, you should already be offered "Red Hat Enterprise Linux Atomic Host 7.2" that you can click on. Switch to tab Installation Media, and tick the Installation Medium you just created.
Content Views, Activation Keys, Host Groups.... oh my.
In order to create a content view, we will need to navigate to the Content drop down menu, create a new content view and give it a name. Switch to the tab OSTree Content and make sure that you can see the OSTree content listed. If it is not, click on Add tab, and add it manually. After you are sure everything looks good you can go ahead and click on Publish New Version. It will publish it and promote it to the environment.

Let's now create an Activation Key which will help us by automatically registering our deployed atomic host back to the Satellite.
Go to Content, then choose Activation Keys. Click on the New Activation Key button, fill in the name, select the adequate Environment and choose Atomic Host Content from the drop down list. Having a Content View attached to the key is quite important, since that will tell the Satellite which kind of content to serve to the machines registered with the said key. In this case, it will tell it that our Atomic Hosts should get access to OSTree content synced on the Satellite.
That is all there is to it, now just click on Save. The end result looks something like this:

Finally, we can create a Host Group to glue all the pieces together.
- Go to Configure, click on Host Groups and then New Host Group. We just need to fill the form in with the already configured items. The name is free form so you can choose whatever you like. The rest is chosen from drop down lists as you can see on the screenshot from our deployment. Make sure that under the Network tab you have the correct domain selected. It should automatically fill the subnet in for you.
- Under Operating system, choose the one we just created, that is "Red Hat Enterprise Linux Atomic Host".
- Under Media drop-down, choose the installation media we just configured, and lastly, leave the Partition table as Kickstart default. The root password will be set to the value you put in the box for the password. In our case, we used the same password as for the Satellite server - 'changeme'.
- The last tab is where the activation keys are attached to the Host Group. Even though it looks like a free form box, it will give you an option to choose a previously created Activation Key when you click on it. So, that is what we'll do as well. When all looks good and filled in, you may click the Submit button.
One last step remains in order to be able to provision the system.
Our Satellite has to provide a proper (default) pxelinux file. Additionally, we'll configure the file so that the discovered host can report back and register with the Satellite properly.
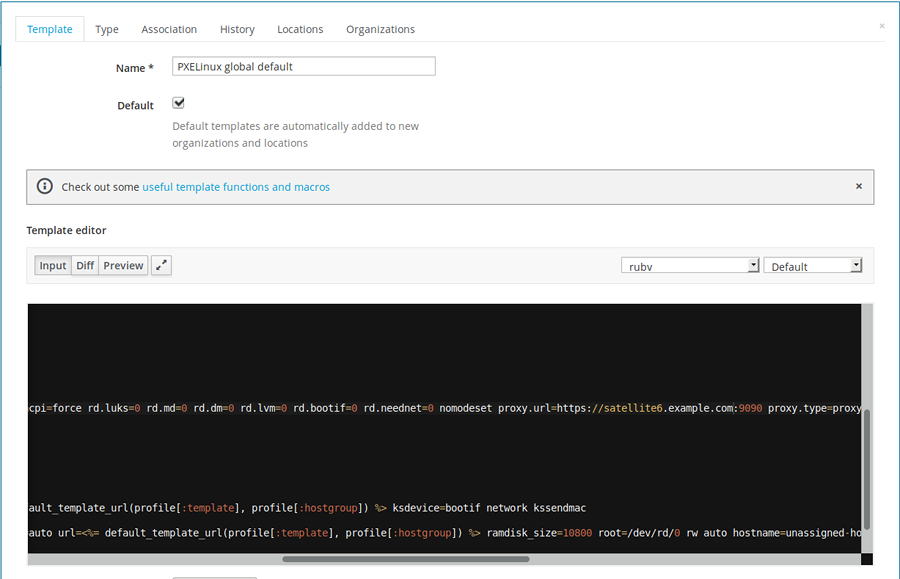
Go to Hosts menu, and under Provisioning Templates search for a PXELinux global default.
What we need to change is SATELLITE_CAPSULE_URL in the editor box and set it to the hostname of our Satellite server, in our case satellite6.example.com. Click submit, and do not forget to click Build PXE Default.
We are now ready to discover and provision our Atomic Host.
Booting and provisioning Atomic Host
In order to get the Atomic Host provisioned and installed, we need to boot the machine in PXE mode (network boot), so that it gets discovered by the Satellite server. Make sure that the machine you are trying to connect to the Satellite is in the same broadcast domain (meaning the same subnet) or that the DHCP packets are forwarded, so that the PXE/DHCP/TFTP will work properly.
When you boot the machine for the first time, it will get the pxelinux default file from the Satellite server, choose the (discovery) from the boot menu shown. When it completes booting into discovery mode, the host will be shown in the list of the discovered hosts in the Satellite server web UI, and the status of the discovery will be printed on the booted machine console as well.
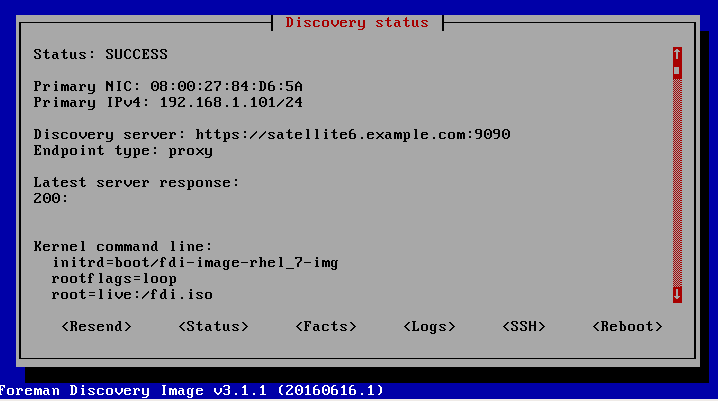
After the host has successfully reported back to the Satellite server (Status: SUCCESS), you can see it under the Discovered Hosts menu in the Hosts drop-down.
Go there and click on the Provision button in the same row which shows some basic info about your host, such as memory, disk size and number of CPUs among other things. A provisioning form will be loaded, which you need to fill in. Due to the preparations we made in the previous steps, this form will have just a few items which need to be written in, most of the things can be selected from the drop-down menus.
Enter a name of your new host, we'll use in our example "atom1".
Choose the host group we created earlier from the drop-down menu, and the rest of the needed fields in your form should be populated automatically.
You can go through the tabs and check if the interfaces are set correctly, and finally under the Operating System tab, set the password for your Atomic Host. If you set the password previously while defining the Operating System, you do not need to worry about setting it again here.
When you are happy with your setting, click Submit. Your discovered host will reboot in a little while and start the deployment of the Atomic Host using the ISO image we downloaded at the beginning and defined as installation medium. We need to be careful that the host reboots into PXE boot again, since that is how it is going to get provisioned.
And your Atomic Host should be up and running. Additionally, you can use the OSTree you synced, to upgrade your atomic host by issuing:
-bash-4.2# atomic host upgrade
After the update has finished, you need to reboot the Atomic Host so that the changes take effect.
Setting up OpenShift Enterprise
Since we're dealing with an Atomic host, the only way to deploy OpenShift Enterprise is within a container. Even though it is possible to deploy it from within AH itself, it is much clearer and less convoluted if we have access to a machine in the environment which can run the required Ansible playbooks for us. We can run this from within the Satellite machine itself, by installing required packages. Alternatively, if you do not want to make changes on your Satelite host, you can deploy the OpenShisft Enterprise with a little help from a separate Red Hat Enterprise Linux Host.
There are a few prerequisite steps taken on the host which will run required Ansible playbook for the deployment. Assuming we have the required subscription, we need to enable the repositories which will provide us with the tools needed to spin Ansible up and execute a playbook which does the hardest part for us. So let's cover this step by step:
1. Enable repositories
[root@rhel ~]# subscription-manager repos \
               --enable=rhel-7-server-rpms \
               --enable=rhel-7-server-extras-rpms \
               --enable=rhel-7-server-ose-3.2-rpms
2. Install the following base packages and update
[root@rhel ~]# yum install wget git net-tools bind-utils iptables-services bridge-utils bash-completion
[root@rhel ~]# yum update
3. Install OpenShift Enterprise utilities
The following packages will provide the tools required for the advanced installation method we will be using to deploy our OpenShift Enterprise in a container on an Atomic Host, such as Ansible and related configuration files.
[root@rhel ~]# yum install atomic-openshift-utils
4. Create and copy SSH key to the Atomic Host
We need to make the host which will run the Ansible scripts able to access the Atomic Host to make the necessary changes. The best way to grant it access without password prompting is by sharing SSH keys. In order to do that, we'll create an SSH key and copy it to our target Atomic Host.
[root@rhel ~]# ssh-keygen
[root@rhel ~]# ssh-copy-id root@atom1.example.com
5. Configuring Ansible
We are now ready to take a few final steps in our deployment. Since Ansible will be running the show, we need to tell it what is required. There is one file of importance here, which we need to change: /etc/ansible/hosts. These are the contents of the file for our example deployment:
# This is the default ansible 'hosts' file.
#
# It should live in /etc/ansible/hosts
#
#   - Comments begin with the '#' character
#   - Blank lines are ignored
#   - Groups of hosts are delimited by [header] elements
#   - You can enter hostnames or ip addresses
#   - A hostname/ip can be a member of multiple groups

[OSEv3:children]
masters
nodes

[OSEv3:vars]
# SSH user, this user should allow ssh based auth without requiring a password
ansible_ssh_user=root
deployment_type=openshift-enterprise
openshift_master_identity_providers=[{'name': 'allow_all', 'login': 'true', 'challenge': 'true', 'kind': 'AllowAllPasswordIdentityProvider'}]


[masters]
atom1.example.com

[nodes]
atom1.example.com openshift_node_labels="{'region': 'infra', 'zone': 'default'}"
Detailed description of each of the stanzas in the file can be found in OpenShift Installation and Configuration manual. This configuration will deploy a single master (with embedded etcd) and a single node. Additionally, we set the access to be completely open, since we are using the Allow All identity provider. There are many other identity providers which can be used, but are out of scope of this demo.
6. Run the playbook
Now that this is done, we can proceed and run the playbook. If the newtorking and DNS are set up properly, and Atomic Host has Internet access it should all run smoothly. Just sit back and wait till the playbook plays out.
[root@rhel ~]# ansible-playbook /usr/share/ansible/openshift-ansible/playbooks/byo/config.yml
When completed, you should get a result similar to this:

7. Enable scheduling
When deployed this way, the scheduling is disabled on the node. You can check the status of the nodes and enable scheduling by issuing a few commands:
-bash-4.2# oc get nodes
NAME                STATUS                     AGE
atom1.example.com   Ready,SchedulingDisabled   43m

-bash-4.2# oadm manage-node atom1.example.com --schedulable=true
NAME                STATUS    AGE
atom1.example.com   Ready     44m
And We're Tickin'!
And we're good to go. We have a running Satellite, ready to provide for all the needs of our future deployments, including atomic hosts. If everything went well in the previously described steps, our provisioned Atomic host should be up and merrily ticking away giving power to our OpenShift Enterprise environment. Accessing OpenShift Web UI should be possible by entering the following address into the browser: https://atom1.example.com:8443. Since we did not set any security up, any combination of user/password should allow a user to log in.

Further reading:
File
About The Author
 Red Hat
Newbie
2 points
Red Hat
Newbie
2 points
Comments